Enabling JMX for Java Application
August 5, 2013 2 Comments
Lets recap JMX technology, before we look at how to enable JMX for any Java related Process.
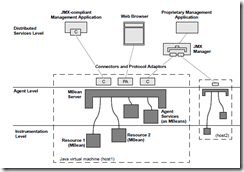
MBeans gets registered themselves with MBeanServer. The registered MBeans can be monitored and managed by an external process. MBeans are exposed to outside process through Connectors/Adaptors. For these to work the respective Adaptor/Connector should be present and running in the JVM being managed. For example HTML adapter should be present in the JVM for a browser-based client to connect to it invoke MBeans.
The diagram below summarizes the concepts. As shown in the image below, multiple clients can connect and monitor & mange the Application.
Connector works in the Client/Server model, where Connector Server which is attached to MBeanServer listens for requests from Client. Connector Client is responsible for establishing the connection with the Connector Server.
Like any other communication mechanism, even Connector communication requires Address & Port of the Connector Server and the protocol being used.
The JMX API defines a standard Connection protocol based on Remote Method Invocation (RMI). This protocol enables us to connect a JMX client to an MBean in an MBean server. Using JMX API we can perform remote management of resources by using JMX technology-based connectors (JMX connectors).
An out-of-box RMI Connector is provided by the Java SE platform. This out-of-box JMX API’s RMI Connector automatically exposes applications for remote management without manually creating a remote connector by us. This RMI Connector is activated by starting the Application with the correct properties. JMX Compliant Management client application can connect to the applications and monitor them remotely.
JMX Client
JMX Client can be Local JMX Client or Remote JMX Client.
Local JMX Client Management application is used for monitoring applications running on the local system.
Remote JMX Client Management application facilitates monitoring of applications running on a remote system.
Platform MBeanServer
JMX technology provides a Java standard to monitor and manage a JVM. Starting Java 5 internals of the JVM are exposed using it in the platform MBeanServer. Several MBeanServers can be created in a single JVM, but Platform MBeanServer is only one.
Enabling Out-of-the-Box Management
Now, lets look at the process of enabling out of box Management. For this example, we will consider Tomcat server.
We can enable the JMX agent for:
- Local monitoring, for a client management application running on the local system.
- Remote monitoring, for a client management application running on a remote system.
Local Monitoring & Management
For Java 5 & previous releases of Java SE platform, to allow the JMX client access to a local Java VM, we had to set the following system property when we start the Java VM or Java application.
com.sun.management.jmxremote
Without setting this variable, when we start the JConsole, we don’t see any java process for the management.
By adding the following options to the startup script, JConsole can view the process
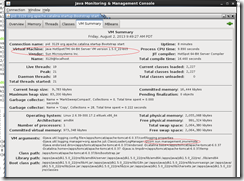
CATALINA_OPTS=-Dcom.sun.management.jmxremote
As shown in the image below, we have started Tomcat with Java 1.5 version and with the system properties.
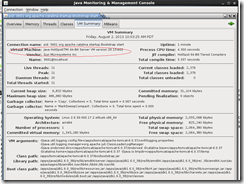
For Java 6 & above releases of Java SE platform, it is no longer required to set this property. Any application started with Java 6 & above, the application will automatically be made available for local monitoring & management when needed.
As shown in the above image, we have started Tomcat server with java 1.6 version and the jmxremote property is not being set. Even then, we are able to connect to the local JVM process.
Remote Monitoring & Management
To enable monitoring and management from remote systems, we must set the following system property when we start the Java VM.
com.sun.management.jmxremote.port=<portNum>
Enabling Security
Since we are enabling the Remote Management of the process, security can be provided to prevent unauthorized persons to monitor & control the application.Configuration is performed by setting system properties or by defining management.properties file. We have 2 mechanisms to prevent unauthorized access.
- Using Password Authentication.
- Using SSL.
Using Password Authentication
Passwords are stored in clear-text in the password file. By default, when we enable the JMX agent for remote monitoring, it uses password authentication. Password Authentication can be set up in a Single-User environment or multi-user environment.
Using the default location
Password is picked from the JRE_HOME/lib/management directory as follows.
1. Copy the password template file, jmxremote.password.template, to jmxremote.password.
2. Set file permissions so that only the owner can read and write the password file.
3. Add passwords for roles such as monitorRole and controlRole.
Using the Custom files which can be used to Set up a Multiple-User Environment
We set up the password file in the JRE_HOME/lib/management directory as follows.
1. Copy the password template file, jmxremote.password.template, to the destination location and can change the name of the file.
2. Set file permissions so that only we can read and write the password file.
3. Add passwords for the roles such as monitorRole and controlRole.
Set the following system property when we start the Java VM.
com.sun.management.jmxremote.password.file=<pwFilePath>
com.sun.management.jmxremote.access.file=<accessFilePath>
Authentication is being controlled by “com.sun.management.jmxremote.password.file”
Authorization is being controlled by “com.sun.management.jmxremote.access.file”
Finally, the startup parameters looks like:
-Dcom.sun.management.jmxremote
-Dcom.sun.management.jmxremote.port=5555
-Dcom.sun.management.jmxremote.ssl=false
-Dcom.sun.management.jmxremote.authenticate=true
-Dcom.sun.management.jmxremote.access.file=/data/jmx/jmx.access
-Dcom.sun.management.jmxremote.password.file=/data/jmx/jmx.password
Using SSL
SSL is enabled by default when remote monitoring and management is enabled. To use SSL, we need to set up a digital certificate on the system where the MBean server is running and then configure SSL properly.
We have to Digital Certificate and insert into the keystore in the machine where the application is running. we add the following parameters to the startup.
-Dcom.sun.management.jmxremote
-Dcom.sun.management.jmxremote.port=<port number>
-Dcom.sun.management.jmxremote.ssl=true
-Dcom.sun.management.jmxremote.ssl.need.client.auth=true
-Dcom.sun.management.jmxremote.authenticate=false
-Djavax.net.ssl.keyStorePassword=<password>
-Djavax.net.ssl.keyStore=<full path to keystore file>
To configure JConsole to use SSL add these parameters to the call:
jconsole -J-Djavax.net.ssl.trustStore=<full path to keystore file> -J-Djavax.net.ssl.trustStorePassword=<password>
Make sure that the trustStore file is the same as the keyStore file for Tomcat, or trustStore and keyStore contain the same certificates with the same alias.
Disabling Password Authentication
Authentication for remote monitoring is enabled by default. To disable both password authentication and SSL, we should set the following system properties when we start the Java VM.
com.sun.management.jmxremote.authenticate=false
com.sun.management.jmxremote.ssl=false
Monitoring Applications through a Firewall
When configuring the RMI for JMX, it actually uses 2 RMI ports; One port is for RMI Registry and the other one is for RMI Objects. The first port is assigned with: “-Dcom.sun.management.jmxremote.port=<port>“. Second port which is for RMI objects is selected randomly at runtime.
RMI Registry port can be opened in the Firewall. we don’t have control with RMI Object port since this port is assigned arbitrarily by RMI stack. To export the remote objects on a given port we need to create our own RMI connector server programmatically.
Related Posts:
https://zeroproductionincidents.wordpress.com/2013/02/18/jmx-basics/
https://zeroproductionincidents.wordpress.com/2012/07/03/design-why-jmx/
https://zeroproductionincidents.wordpress.com/2013/07/20/serviceability-in-hotspot/


Pingback: Dynamic Attach | Zero Production Incidents
Pingback: Enable GC Logging without restart | Zero Production Incidents